

How to Force Youtube to Upload in Vp9 2019
DISCLOSURE: As AN AMAZON ASSOCIATE I EARN FROM QUALIFYING PURCHASES.
THIS POST MAY Comprise AFFILIATE LINKS, MEANING, AT NO ADDITIONAL Price TO YOU, I EARN FROM QUALIFYING PURCHASES. AFFILIATE LINKS ARE MARKED WITH #ad . "I" IN THIS Case Ways THE OWNER OF FILMDAFT.COM. PLEASE READ THE FULL DISCLOSURE FOR More than INFO.
Update: After I initially wrote this article, YouTube has included a new codec called AV1 (aka AV01) – not to be dislocated with the old AVC1 I write virtually in the article. AV1 offers better quality than VP09 – fifty-fifty at lower fleck rates.
It doesn't look like you lot tin force YouTube to play your ain videos with the AV1 codec at the moment. It appears as if YouTube is still testing the format on the videos they choose.
Just you can force YouTube to play videos with the AV1 when possible by going to the playback performance page under your YouTube account and choosing "Always prefer AV1".
So you tin can go to the AV1 Beta playlist page and see videos compressed with AV1. Y'all tin can see if a video plays with AV1 past using "Stats for nerds" equally described under the "How to know which codec YouTube has used to compress your video" subheading farther downwards in this commodity.
So you've just finished editing a video, and when you lot scout it dorsum on your computer, everything looks bang-up.
And then you lot upload it to YouTube and the image quality looks horrible due to the compression YouTube applies to your footage. Sucks correct?
In this article, I'll guide you through some tips and tricks on how to improve the image quality of your YouTube videos.
But outset…
Why is the prototype quality bad on YouTube?
No matter what codec you lot employ when y'all consign your video from your editing program of choice, YouTube will apply extra pinch to your footage when you upload your videos to reduce the size of the file.
When YouTube compresses your videos information technology tin cause all kinds of digital artifacts – from blockiness to banding to bad skin tones.
Such artifacts are ofttimes seen in dark areas or shadows, large areas of a single color, in blurry shallow depth-of-field backgrounds. Digital artifacts too show in footage with a lot of film grain, fume, or a lot of other particles.
The reason for this has to do with how something called interframe compression is designed.
Interframe pinch don't like randomness in video footage
Interframe compression works by throwing away information (data), which appears similar across frames e.grand. a dark corner in a kitchen scene in your brusque film.
When in that location are minor changes (such as in shadows), the compression codec might interpret it equally a single dark area and throw away a lot of the data which is actually in that location in the shadows.
The result is, that you lot'll end up with a lot of digital blockiness in the nighttime areas of your frame.
The YouTube compression can also take a difficult time of compressing footage with a lot of randomnesses (such equally in pic grain). This is considering the arbitrary nature of film grain, smoke, pelting, snow, and other random visible particles will brand every frame incorporate vastly different information from the last.
Randomness will give a codec a hard time, but that doesn't go along the algorithm from trying, which volition result in your nice clean video ending upward looking like digital mayhem.
But don't have it from me. Watch this fantabulous video made by Tom Scott, which actually shows what pinch tin do to footage with a lot of random elements.
It is interesting that randomness causes a bad image quality. Because adding randomness in terms of manually adding noise is a well-known trick to battle banding and compression artifacts in still photos you upload to east.g. Facebook and Instagram.
Only if you add heavy film grain (which is random) to your video to become a more organic wait or your footage is underexposed and noisy, then you're actually setting yourself up for failure.
How to increase your paradigm quality on YouTube
Then what can you do virtually it?
When you lot upload a video to YouTube, YouTube will reencode and recompress your footage. This will crusade a loss of quality no matter what yous practice.
And then it doesn't affair what codec you use to export your video, as long equally you lot use a container, which YouTube will accept. And as long as you don't use a setting (bitrate) which degrades the footage too much.
YouTube has two codecs it automatically chooses betwixt – the avc1 and the vp9. The vp9 codec offers a much college epitome quality than the avc1.
How to know which codec YouTube has used to compress your video
But how do you know which codec YouTube has used to reencode your video?
To see what codec you have right-click on the gear cog where you would change the video resolution & select "stats for nerds":

Force YouTube to ever utilise VP9
I've read several attempts on how y'all can force YouTube to ever use vp9 whenever you lot upload a video.
One of these steps includes calculation 1% of saturation to your video with YouTubes own video editor, which seemed to work for a while. Merely I've not establish it to piece of work any longer.
Another trick was to upload a short video in 4K. While it works for the 4K video, I've found that it doesn't automatically utilize the vp9 to later videos in east.chiliad. 1080p.
And so what to practise then?
Well, there seems to be a general consensus online, that if you lot run a big channel with millions of subscribers vp9 will be the standard codec applied.
Since I don't accept such a channel, I take no way of testing if this is true or non. If you exercise, delight share your experience in the comment department below.
If you're non a large YouTube star, yous accept to take another approach.
If you scan to the YouTube section on Recommended upload encoding settings, you read this nether the recommended video bitrates for SDR uploads,
To view new 4K uploads in 4K, utilise a browser or device that supports VP9.
Source:
https://support.google.com/youtube/answer/1722171?hl=en
And below this statement, there are a couple of tables (one for SDR and 1 for HDR) with recommended bitrates.
I've taken the liberty to reproduce the most commonly used video sizes for SDR (as HDR videos aren't that common nevertheless) in the table below:
| Video Size | 2160p (4k) | 1440p (2k) | 1080p (FullHD) | 720p (Hard disk drive) |
| Video Bitrate for 24, 25, and thirty fps | 35-45 Mbps | 16 Mbps | 8 Mbps | five Mbps |
| Video Bitrate for 48, 50, and 60 fps | 53-68 Mbps | 24 Mbps | 12 Mbps | 7.5 Mbps |
Now, this is interesting. What it basically says is that any 4K videos volition be rendered with VP9.
So the outset solution I've establish is to export your 1080p Full Hd videos as if they were 4K. They may not look beautiful in 4K – or 2K for that matter – but in FullHD, they volition look normal. And because they were uploaded as 4K YouTube will use the VP9 codec even when they're played back in 1080p.
I then tried to upload a video in 1440p (2k) with a frame rate of 50fps – and lo and behold – it actually too used the vp9 codec:

But the same video in 1080p 50fps had the avc1 codec applied instead.
Likewise, I tried uploading a 1440p 25fps video with the recommended bit rate settings, and that video too was shown with the avc1 codec.
So I thought, that maybe if I fiddled with the bitrate, I might be able to forcefulness YouTube to use vb9. And then I exported the video as FullHD merely with the bitrate settings used for 4K:
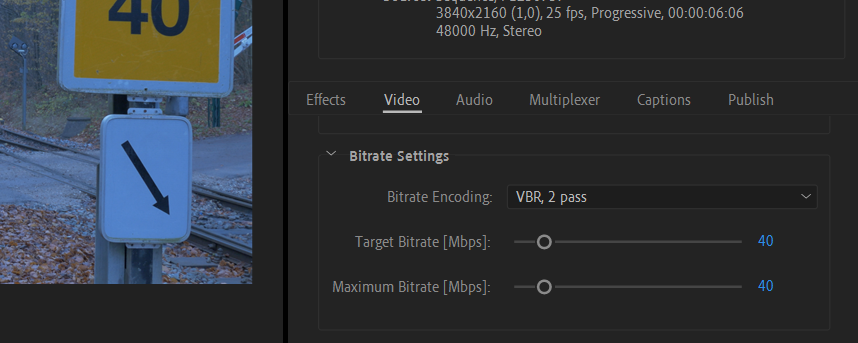
But no luck! The bitrate settings alone don't decide the codec applied by YouTube.
Conclusion
So what can we larn from this? Well, a couple of things:
YouTube doesn't like randomness in video footage because of the interframe compression.
Because of this, it is non wise to add together picture show grain to your flick. So adding noise to reduce banding is merely advised for still photos – not video.
You should also e'er remember to expose correctly then your footage isn't underexposed and noisy.
The vp9 codec offers improve image quality than the avc1 codec.
You lot might be lucky and take the vp9 codec on as default on your aqueduct if your channel is big enough. I still demand proof of this.
There seem to be 2 minimum factors needed to manually tricker the vp9 codec for your footage:
- Upload your video in 4k (2160p)
- Upload your video in 2k (fifty fps) – 48 fps might work – I haven't tested this.
Did I miss anything? Do you have a improve way? Or did you spot a fault in my approach? Please let me know in the comments.

Near the author:
January Sørup is a videographer and lensman from Kingdom of denmark. He'due south the possessor of filmdaft.com and of the Danish company Apertura , which produces video content for big companies in Denmark and Scandinavia. January has a background in music, has drawn webcomics, and is a sometime lecturer at the University of Copenhagen.
Source: https://filmdaft.com/how-to-get-better-image-quality-on-your-youtube-videos/
0 Response to "How to Force Youtube to Upload in Vp9 2019"
Post a Comment